
Create With Me | 2024 Handmade Journal on a Budget
How to create a beautiful Journal with items you have at home.
✓ Quote Pocket
✓ File Folder
✓ Iron-on Transfer
✓ Fabric Cover
✓ Hand-embroidery
✓ Ephemera
Put the kettle on and pull up a chair Friends, we are going to get our journal on!
Blessings, K xo
How to create a beautiful Journal with items you have at home.
✓ Quote Pocket
✓ File Folder
✓ Iron-on Transfer
✓ Fabric Cover
✓ Hand-embroidery
✓ Ephemera
Put the kettle on and pull up a chair Friends, we are going to get our journal on!
Blessings, K xo

Paint With Me | A Rose Gold Christmas - Watercolour & Embroidery - Gift Card Series
A Rose Gold Christmas is something a little special. We've moved away from the traditional red & green colour palette for this video and have embraced a softer, more feminine style with a touch of glamour.
The perfect blend of amber, Palm Beach pink and bling, this video has everything . . . Watercolour, Hand-Embroidery, Glitter & Stamps!
Pull up a chair and your fav. supplies for card making with a difference!
Blessings, K xo
Welcome to PART II of our Seasonal Gift Card Series.
A Rose Gold Christmas is something a little special. We've moved away from the traditional red & green colour palette for this video and have embraced a softer, more feminine style with a touch of glamour.
The perfect blend of amber, Palm Beach pink and bling, this video has everything . . . Watercolour, Hand-Embroidery, Glitter & Stamps!
Pull up a chair and your fav. supplies for card making with a difference! Blessings, K xo

Paint With Me | A Traditional Christmas - Watercolour & Embroidery - Gift Card Series
It's the most wonderful time of the year my Friends. Time to be thinking of long held family traditions, long newsy letters to those we adore and plenty of Christmas crafting. I love that the post is full of beautiful cards, messages of love and parcels instead of bills. It just adds to the magic and joy of the season.
I have 2 handmade cards to share with you today - Under the Mistletoe and Merry & Bright in a pretty layering of watercolour and hand embroidery. Don't worry, they are beginner friendly, I promise!
It's the most wonderful time of the year my Friends. Time to be thinking of long held family traditions, long newsy letters to those we adore and plenty of Christmas crafting. I love that the post is full of beautiful cards, messages of love and parcels instead of bills. It just adds to the magic and joy of the season.
I have 2 handmade cards to share with you today - 'Under the Mistletoe and Merry & Bright in a pretty layering of watercolour and hand embroidery. Don't worry, they are beginner friendly, I promise!
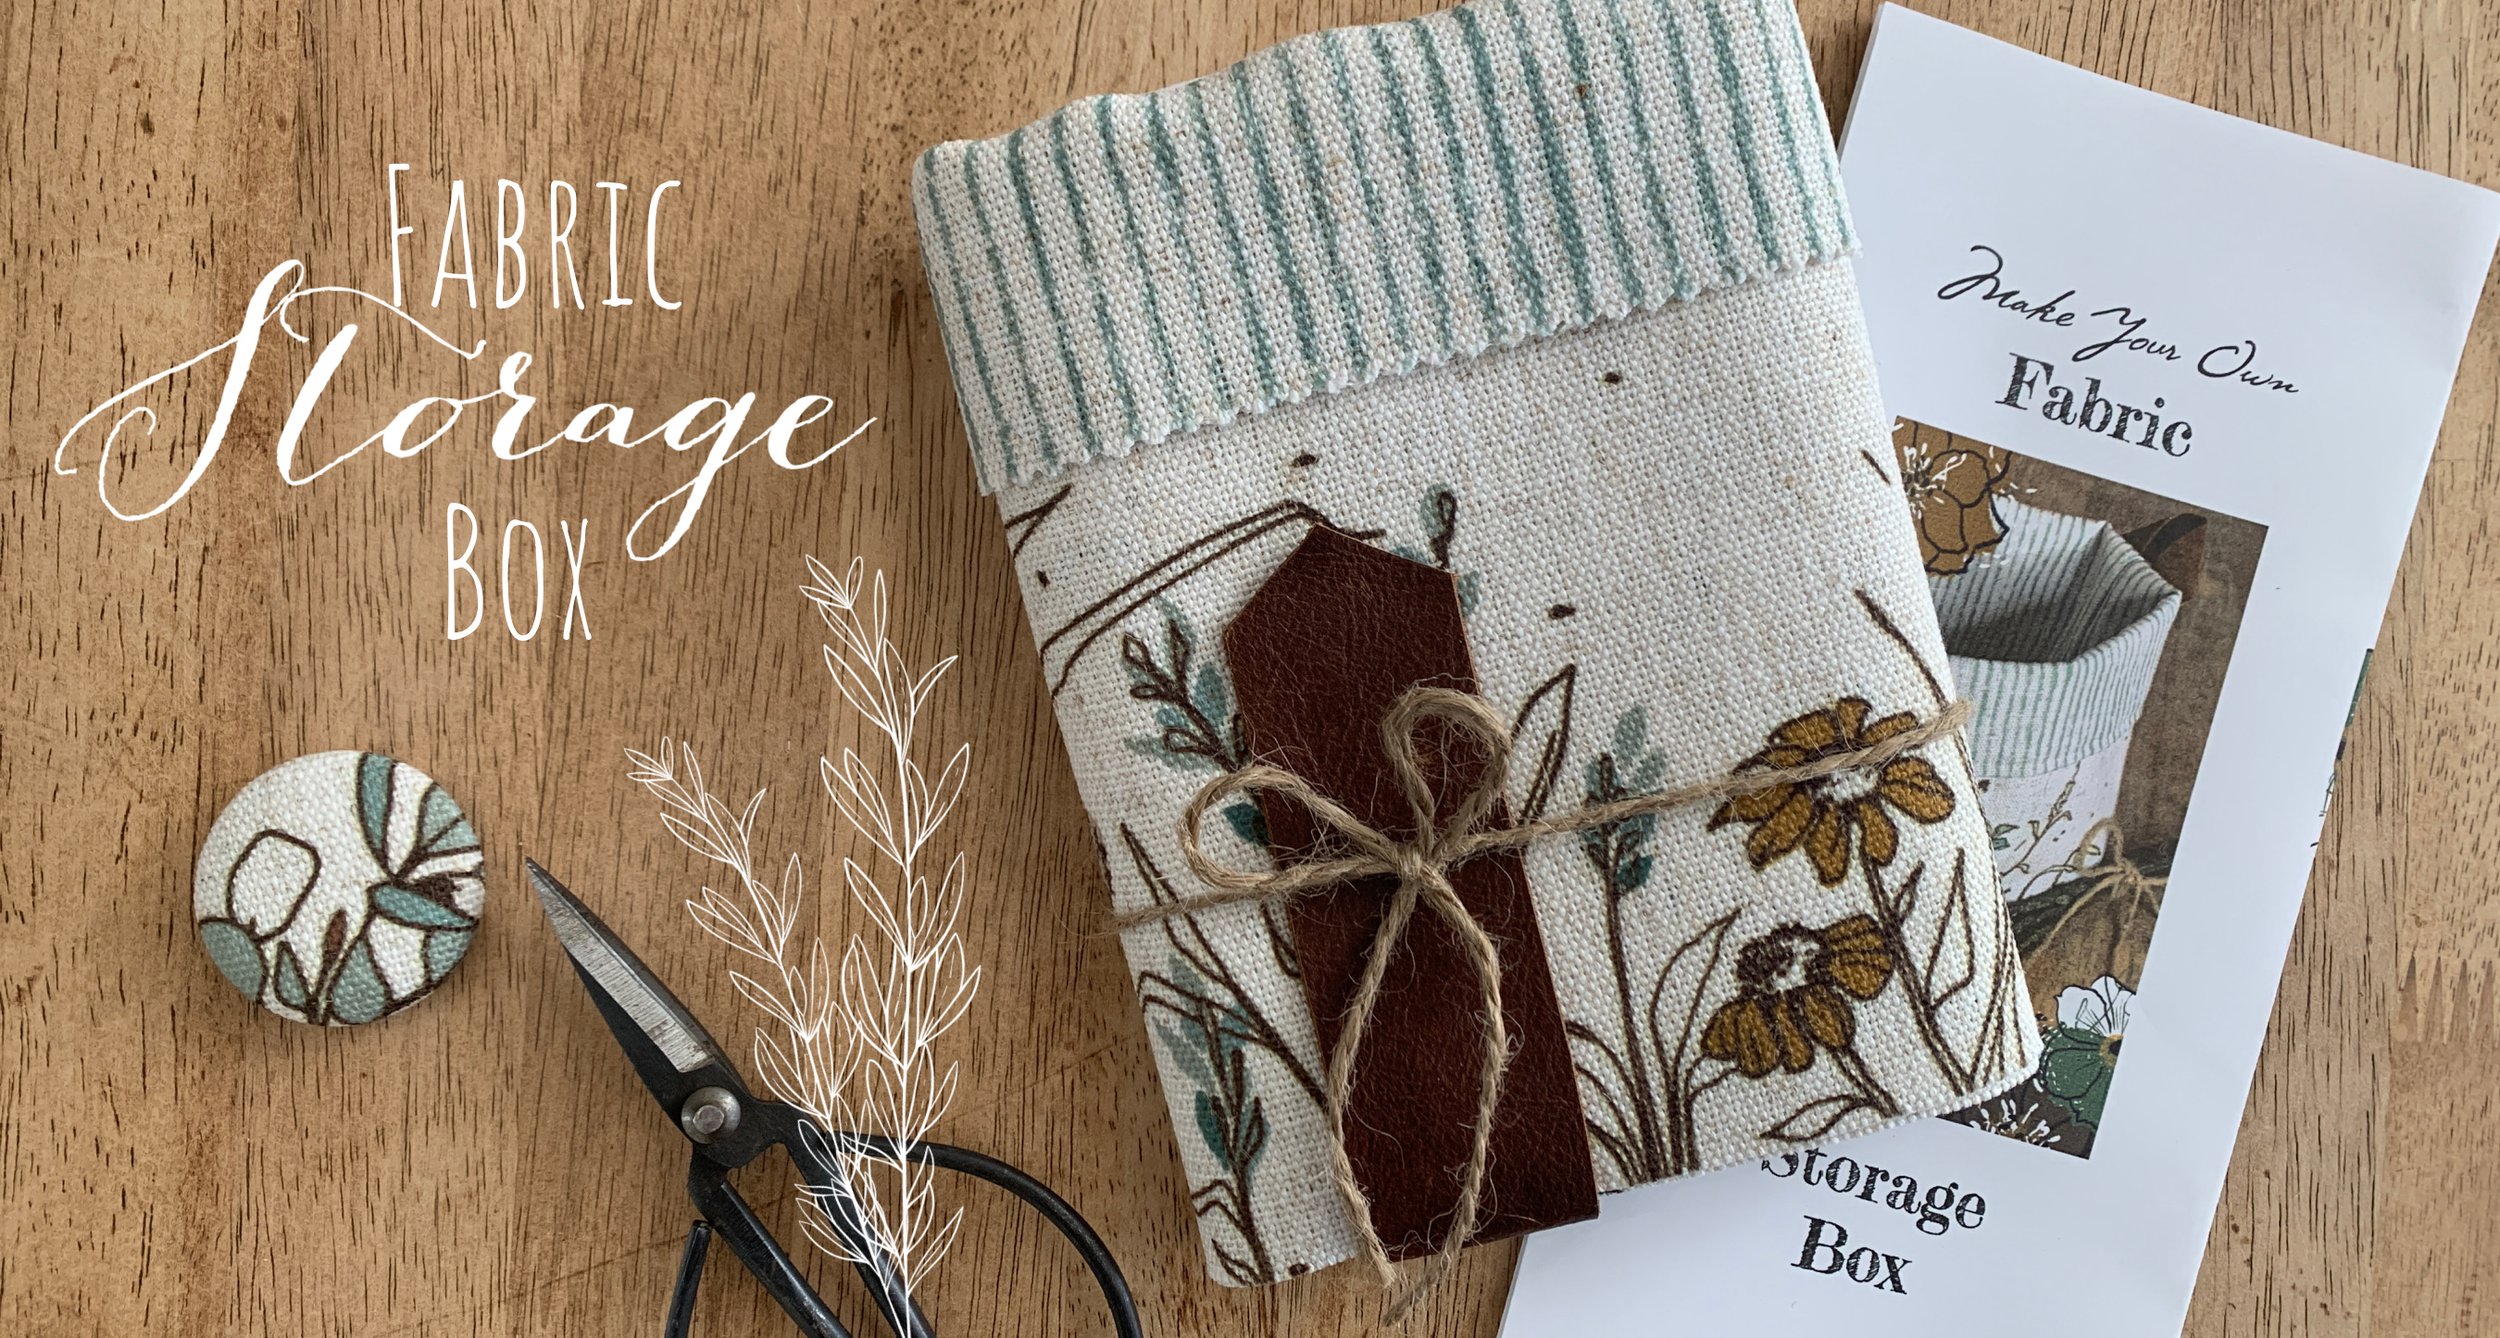
Make Your Own | Fabric Storage Box
Celebrating the release of our NEW DIY KITS, this instructional video will have you making the prettiest Fabric Storage Boxes you ever did see. Whether you choose to create with one of our Kits, or with all the beautiful fabrics you already have stashed away at home, all the details you need are right here!
Celebrating the release of our new DIY KITS, this instructional video will have you making the prettiest Fabric Storage Boxes you ever did see. Whether you choose to create with one of our Kits, or with all the beautiful fabrics you already have stashed away at home, all the details you need are right here!

How to Create Your Own Notepads
As an Artist + Designer who is always sketching or jotting down ideas, I always feel more inspired when I begin my musings on pretty stationery. Obviously I’m not alone in my love affair with stationery, however if you are hoping to support local small businesses with a strong sustainable message, then options for your stationery can become rather hard to find and super expensive too.
This is how I began my notepad journey and I’m looking forward to sharing all my tips and tricks with you!
As an Artist + Designer who is always sketching or jotting down ideas, I always feel more inspired when I begin my musings on pretty stationery. Obviously I’m not alone in my love affair with stationery . . . ahem . . . introducing Kikki K, Typo, Daiso, to name but a few. If you are hoping to support local small businesses with a strong sustainable message, then options for your stationery can become rather hard to find and super expensive too. Here’s where you come in. Are you a doodler, a painter, a creative type? Do you make your own paper? Would you like to make a notepad or book with quality artists paper to enjoy a little plein-air (outdoor) painting? Or would you like to get the kids to help you make a special notepad for someone they love? Then you are in the right place my friend because this is exactly how I began my notepad journey and I’m looking forward to sharing all my tips and tricks with you!
First of all, just choose the paper, card-stock or artwork that you would like to use in your notepads. You won’t need expensive binding machines but you will need Padding Compound - the ‘magic’ glue and must have ingredient when binding books and notepads. This is the important ingredient that turns a simple stack of paper into a solid pad from which it is possible to tear out just one page at a time without destroying your whole book. And, before you ask . . . NO! standard PVA glue just won't do.
The 'How to' is actually so very simple . . .
Take your stack of loose pages that have been neatly trimmed to ensure they are all the same size. They can be coloured, white, lined, thick, thin or blank - whatever your heart desires
Tap the edges firmly on a table or counter top to ensure pages line up evenly - especially at the top edge where you will be applying the Padding Compound
Grab a handful of bull dog clips to hold your pages tightly together at the top where you will be applying the glue (most people will have them on hand at home, however they can be purchased very cheaply from any newsagent, stationery store, even your local supermarket. Mum and Dad may even have lots on hand at work that you could use and return once you are finished with them. Just make sure it is ok with the boss first).
TIP: Add a thick piece of cardboard to the top and bottom of your stack (sandwiching your paper between). This will give your pages more substance - keeping everything secure and protected until the compound has dried. The cardboard will be removed once everything is dry at the end so don’t worry if it is recycled packaging you had on hand as it will be discarded at the end. Plus you can give yourself a little extra pat on the back for being kind to the Earth by doing something useful with excess packaging before it heads off to become landfill. In fact, I don’t throw my cardboard pieces away at all. I pop them in a craft drawer to use again next time.
TRICK: If you don’t have any bull dog clips, carefully stack your pages and then place several heavy books on top of your notepads to compress the pages as much as possible ready for gluing. The books will need to stay in place until the Padding Compound has completely dried.Take a small brush and your pot of Padding Compound and apply the glue in a light, even layer to the top edge or spine of your notepad | book - you will repeat this step several times to build up a nice even layer so don’t worry about being too heavy handed at first. The compound will be touch dry in around an hour, depending on the weather, and ready for a 2nd and 3rd coat. I then like to leave my notepads to sit overnight to dry. An expensive brush is not required so please don't go to the expense. Any small brush will do - something you can work with easily. I recommend you wash the brush well with warm, soapy water when you are finished - the compound is non-toxic but it is strong so the bristles will be hard as rock if you don’t ;)
TIP: This is a terrific craft project to do with children as the glue is water based for an easy clean up AND can also be tinted with a drop or 2 of food colouring (did someone say rainbow?). Do take care to add only a drop or two of colouring to a pot of Padding Compound to ensure it doesn’t compromise the product. The pot too is refillable. Simply bring it back for a discount on your top up or repurpose in your craft room to hold beads, glitter etc.If creating with children, the next step will need to be done by a responsible adult. Take a sharp blade - I use a craft knife with a curved blade. Once again, a specialised knife really isn't needed. Most people would have a flat edged kitchen knife that would do the job equally as well. Remove the heavy book weights or bulldog clips from the notepads and set aside. If you have used cardboard to stabilise the pages, place the stack back down on a hard surface and carefully slide the knife between the cardboard | packaging and the first page of your book. Taking care to cut away from you, slice the notepads apart. Tear the top page off (it may already be loose) and voila! Gorgeous, bespoke notepads made in your home and to your own specifications.
TIP: Leave a chick piece of cardboard on the back of your notepad. Not only will it protect the last page, but it will create a solid surface on which to write.
I hope you have enjoyed this easy ‘How to’ Tutorial. The Notepads shown in the photos are my own and are available to purchase in store if you are interested. Having struggled to find pretty stationery with a sustainable, small business focus, I began to research how to create my own and this tutorial was born. For more projects like this one, connect with me on Instagram or subscribe to my YouTube Channel. I look forward to seeing you there!

Growth Planner - Notepads

Create With Me | Easy Air Dry Clay Tags
Does your kitchen storage need levelling up? How about your gifting game? Then come with me as we create budget conscious, super easy, air dry clay tags in minutes.
Rustic and full of character, I swear you will be making these sweet tags for every one and every room in your house!

Easter Eggs | 4 Easy Steps to Make Your Own
Easter is almost upon us and whatever this season means to you and yours, it just wouldn't be the same without Easter Eggs. This quick and easy tutorial will walk you through how to create your own. Whether you are a clever crafter or just a beginner, this one is for you and YES! the kids can absolutely join in the fun.
Not only is this project sustainable and economical, it is crazy clever. Now all you have to do is decide what will be hidden in yours? Chocolates, tiny toys or maybe a special piece of jewellery for the one you love?!
Easter is almost upon us and what would it be without our furry friends, a little bit of magic and the gathering of family & Friends?
I have a whole lot of all the above for you today with a craft project that is sure to delight all, from big kids to small. Pull up a chair Friends and let's get hand-dying, hand-painting and hand-filling Easter Eggs with wonderful surprises for all your loves xo

Plan With Me | 2023 Journal Set-Up
It's time to ring in the New Year my Friends and what better way than to spend some time creating a new journal set-up 100% focused on you!
Grab a cuppa' Friends, this one is a long one, with almost 40 minutes of creative doodles, ink, watercolour, quotes and sentiment all rolled into one.

Create With Me | Handmade Journal
Are you a conscious consumer? A lover of the unique? On a budget? Is reduce, reuse, repurpose in your blood? Then come sit down with me as we create a journal just for you!
I promise you that not only are we budget conscious here on the Channel, but we love a heaping helping of pretty and purposeful too.

Create With Me | Project Gather - Welcome to My Home
Sharing a fun home reno and a peek bts of my Studio and Home as we paint and style this project together. Perfect for the home renovation enthusiast on a budget.
Come say Hi as I finally show my face here on my Channel - eeek! I am totally a behind the lens kind of girl so this is waaaaay out of my comfort zone.

Create With Me | Seasonal Decorations - Foraged & Found
Whether you are dressing a table for Thanks Giving, trimming the tree for Christmas, creating a spooky scene for Halloween or rustling up a little bunny goodness for Easter, this fun project is for you!
Made simply from objects foraged and found in my craft cupboard and out in nature, this tutorial is a wonderful way to get creative on a budget.

Plan With Me | September 2022
All the Moroccan vibes this month as I create September's journal with the help of a handmade stencil, acrylic paint and lashings of texture and colour.
This month is all about simple shapes and layering colour and is just perfect for Beginners. Grab your favourite supplies and get comfortable for the next 20 minutes as we get creative together.

Handmade Journal | Vintage Inspired
Sharing a peek BTS as I create a handmade Journal. I know I've been promising to share this one with you for the longest time so I do hope it's been worth the wait.
As a BuJo lover, I like nothing more than personalising my pages each month to really set my soul on fire and to inspire the days, weeks and month ahead. If you too find standard journals a bit limiting, I hope that you will be inspired to create your own.
This vid is a super short one . . . just 45 seconds of content and captions so feel free to slow it down, pause or even replay it to catch all the steps.

Homemade Vegetable Stock
The season has certainly shifted here on the Gold Coast, Queensland, Australia. The constant rain that has been with us since last September, has been accompanied by much cooler days. The jumpers finally came out over the weekend and the sniffles came a'callin’ so homemade chicken soup was the order of the day. There’s nothing like fresh, crunchy bread and a steaming bowl of fragrant soup to get you back on your feet and to chase those Winter chills away.
The season has certainly shifted here on the Gold Coast, Queensland, Australia. The constant rain that has been with us since last September, has been accompanied by much cooler days. The jumpers finally came out over the weekend and the sniffles came a'callin’ so homemade chicken soup was the order of the day. There’s nothing like fresh, crunchy bread and a steaming bowl of fragrant soup to get you back on your feet and to chase those Winter chills away.
Most families have their secret recipes that have been handed down through the ages, and ours is no exception. I have tweaked our families Homemade Chicken Soup recipe over the years to suit the tastes of growing children, however nothing has had the impact that this little gem did quite some years ago. All these years on, I can’t remember exactly where I heard this little secret, but it has certainly been a game changer when it comes to our homemade soups and casseroles.
We’ve all heard that the most nutrients are 'just under the skin' in fruits and vegetables and we are more conscious than ever about what we eat and where it comes from. The slow living movement has also been a timely reminder to be more mindful of how we live, to reduce, reuse and recycle. I have to admit, that I have always hated wasting food. I didn’t grow up in a wealthy family and have raised my children to appreciate second hand, vintage, preloved. Don’t get me wrong, new is a wonderful thing, but being a little more careful with how and why we spend our money has allowed us to make memories we otherwise wouldn’t. We’ve lived and renovated, travelled and explored the world in ways we wouldn’t if we had been adverse to getting our hands dirty. As a result, this clever cooking tip has been embraced in our family as not only a tasty alternative but a way to make a difference in our world.
INSTRUCTIONS:
In order to begin the process of making your own Homemade Vegetable Stock, first you must collect the material needed. This is as simple as collecting your usual veggie scraps as you go about your regular, daily meal prep ie. making a salad or stir fry for the evening meal. Instead of discarding the skin from your onion, garlic, ginger, carrots . . . the leaves from the celery, the off-cuts and seeds from a capsicum etc, pop them into a large, resealable bag or big empty container and put them into the freezer (yes, the freezer). This will keep them fresh while you continue to add to your stock supplies over the coming days | weeks. Simply pull this bag | container our when prepping meals and throw your scraps inside. Continue to reseal and freeze each time until your container is full. Expect this process to take a couple of weeks, although you may be surprised just how fast it fills up
When your scrap container is full, simply empty the contents into a slow cooker or large stock pot, cover with water and allow to simmer gently for at least half a day. Honestly, the longer they cook, the better your stock will be. And another little bonus . . . the smell is amazing!
Make sure to add a lid to your slow cooker or pot to ensure the moisture stays inside and doesn’t evaporate. Check on the progress of your stock throughout the day. The water level must remain high and you will notice the water slowly change from clear to a deep, rich, fragrant brown as it absorbs all the nutrients from your vegetable scraps
All that is left to do is to drain the scraps, retaining the stock in a few handy jugs, and discard the soggy vegetable scraps that remain. Make sure to add them to your garden or compost heap - Mother Earth will be ever so grateful you did
THINGS TO NOTE:
DO NOT add meat scraps or egg shells! NO fruit peelings (oranges, apples etc), and NO scraps that are showing signs of spotting or decay
This delicious Vegetable Stock can be made ahead of time - I like to make my stock the day before use, OR pour it into resealable containers and freeze to use at a later date. A little hint: freeze in large volumes for soups and smaller volumes ie. in ice trays, to use on a smaller scale to flavour casseroles and stews
Vegan friendly stock that delivers the ultimate feel good vibes . . . Good for you, Good for the hip pocket and Good for the planet!

Frozen Vegetable Scraps

Homemade Chicken Soup
Sharing a wonderful family recipe with you today for Homemade Chicken Soup. This one is truly made from scratch my friends - starting with the delicious broth or stock. Perfect for the meat lover or vegetarian | vegan as I will be sharing two recipe options with a full shopping list for each. Truly for the mindful chef who loves to spend a little time in the kitchen.
Sharing a wonderful family recipe with you today for Homemade Chicken Soup. This one is truly made from scratch my friends - starting with the delicious broth or stock. Perfect for the meat lover or vegetarian | vegan as I will be sharing two recipe options with a full shopping list for each. Truly for the mindful chef who loves to spend a little time in the kitchen.
This recipe has been handed down through the ages and is one that I remember from when I was a little girl. As with all good recipes, it has been modified through the years by each cook as we all cook intuitively and from the heart. I am therefore, going to share 2 options with you - one for the meat lover which will include chicken, and one for the vegetarian | vegan. Both recipes are so hearty and full of flavour that they are bound to become a favourite.
OPTION 1: Traditional Chicken Broth
Place a whole, organic, free range chicken in a large stock pot
Cover with water and simmer on low for hours - until the meat is falling off the bones
Strain the stock from the chicken and put aside to cool - this will be added to the soup later
Discard the bones and skin and shred the chicken - put aside to be added to the soup later
OPTION 2: Homemade Vegetable Stock
Making this stock, although not complicated, does take a some time, so I have shared the ‘how to’ in the previous post . . . Homemade Vegetable Stock
Defrost a lovely large batch of stock prepped and made earlier or . . .
Strain the stock from your veggie scraps and put aside to cool - this will be added to the soup later
INGREDIENTS:
Approx. 2 kg Organic, Free Range Chicken (Option 1 Only)
Celery - Approx. 1/4 of a Bunch - Chopped
Carrots - 3-4 Large - Diced
Swede - Medium - Chopped
Parsnip - Large - Chopped
Potatoes - 5 x Medium - Peel & Cut in halves or thirds depending on size - Leave chunky
Brown Onions - 2 x Medium - Peel and dice
Garlic - 5 x Cloves - Peel & Dice finely
Ginger Root - 1 x Large Piece - Peel & Dice finely
Olive Oil - 2 x Tablespoons
Curry Powder - 1-2 Tablespoons (to taste)
Vegeta - 1-2 Tablespoons (Option 1 Only) - to taste
Bread - Fresh and crunchy and completely of your choosing
Rice Noodles - 400gm Packet of wok ready noodles - not dehydrated (Optional)
INSTRUCTIONS:
Heat olive oil in deep, heavy base pan | stock pot
Prep brown onions as directed, sauté slowly, on low heat - until clear
Prep ginger root and garlic as directed, add to onions and continue to sauté on low hear until fragrant
Add curry powder, stir gently to combine
Add pre-prepared chicken, stir gently to combine (Option 1 Only)
Add pre-prepared broth or vegetable stock
Add pre-prepared vegetables, stir gently to combine all ingredients
Add lid to pan | pot to retain heat and stop loss of liquid broth | stock
Turn heat up until soup boils then adjust to low heat to retain a gentle simmer. Leave your soup to cook all day to infuse the flavours and allow the vegetables to cook through
Taste at intervals to check flavour - add Vegeta (Option 1) and | or curry powder if required and to suit your taste
THINGS TO NOTE:
You will notice that I added Rice Noodles to the list of ingredients, however I haven’t mentioned them again until now. That’s because they are actually a 3rd option and one that my daughter loves. For those of you who are a lover of “noodle soup”, as Joey would say (Friends reference), or that have little ones who like everything better when it has noodles, try adding some wok ready noodles to your bowl before ladling over the soup. You will note that I don’t say ‘add them to the soup’. That’s because the noodles will overcook and ruin the integrity of both the soup and noodle. Simply open a packet of wok ready noodles (ie. NOT dehydrated noodles and of the rice variety if you are vegan), pop them into a pot or bowl and cover them with boiling water (from the kettle is fine). Loosen them up with a fork before draining the water back off and portioning them out into bowls. Pour piping hot soup over the top and serve
The addition of curry powder should be specific to you and your family and can be omitted if you prefer. We are generally quite generous in our family as we enjoy the flavour and the little bit of heat it brings. If you are taking some soup to an elderly family member or neighbour, I suggest you don't add curry as it can make them cough (this is a little gem I gathered from personal experience). Curry powder can always be added once you have ladled out their portion that way no one misses out on this delicious soup!
When I make soup, I make enough to feed an army! This recipe makes enough to feed a family of 4 for several days
This soup freezes well so don’t be afraid to ladle some into a container to freeze for another day. So good to come home to after a huge day. Just remove from the freezer, transfer to a pot and heat gently for a fabulous dinner in 30 minutes
It’s a little bit magic! I have made this soup for many friends, neighbours and family when they have been unwell and they all swear it is magic. It’s something about the nutrient rich stock | broth, teamed with the vegetables, garlic, ginger and curry that instantly clears the head and sinus passages. I honestly believe that a gift of the heart and your time is the real secret. Either way, I hope you love this gift from my family to yours xo

Homemade Chicken Soup made w. our own Homemade Vegetable Stock